You can learn NodeJS: Part I

Photo by Tim Gouw on Unsplash
It has been some time ever since I started thinking on writing this series of articles, and more importantly, how to do it, my target here is not to teach you NodeJS for web development, is simply to show you through clear examples that is possible to learn and really cool once you get to master it. I will not use examples like a ToDo application or a blog like other people normally do, let’s do something different, let’s create a simple boilerplate that might be reusable for you in several scenarios in the real life. Please always keep in mind that I’m not try to impose a standard through these articles, there are several ways to reach the same result, and if you feel you have a better one, leave it as a comment so everyone can learn from you (me included). That being said, let’s start with a bit of history.
Coming from full-featured frameworks such as Laravel, Symfony or Django are, for me was really difficult to get adapted to the minimalism that represents to start with only a dependency file, but once I got used to it, I loved it, that freedom and chaos of being able to do things however you feel like, feels almost like being the almighty god on your codebase, but you should always bear in mind that:
With great power comes great responsibility — Uncle Ben
And that’s my target, to show you how you can get the best out of that power without risking anything.
Now let’s get our hands dirty.
Getting everything ready
First you have to start by installing NodeJS, this step varies depending on the OS you are working on and the method you want to use, either build it from source, use a package manager, or the classic easy double-click method which is the one I’m gonna use to save us some time. In order to download the installer, you have to access here and you should see a page like the screenshot below:

The NodeJS website is smart enough to recognize which OS you are using and based on that, offer you the correspondent installers, you can select, either the latest version or the LTS, I’m using the latest version because I’m the kind of guy who likes to test everything new, feel free to choose whatever you want, the result of this tutorial will be compatible with both presented there (at the time of this article). The process to install is not hard and you can find several tutorials on how to do it through all the different methods mentioned before.
Right after you install NodeJS, you can validate the installation simply by executing in your terminal:
node --version
If you got something like this:

Congratulations, you are one step closer to the mastery :)
Now let’s create the project folder and start adding some dependencies. In order to do this, just create a directory somewhere around and open a terminal inside of it, that’s the first step to create a NodeJS project, way to simple isn’t it? :D
The first command to run is:
npm init -y
NPM stands for Node Package Manager, and is the tool used for installing dependencies (modules) in your project, run scripts and some other more advances applications which we will not cover at first, the command mentioned above should output like the following image:
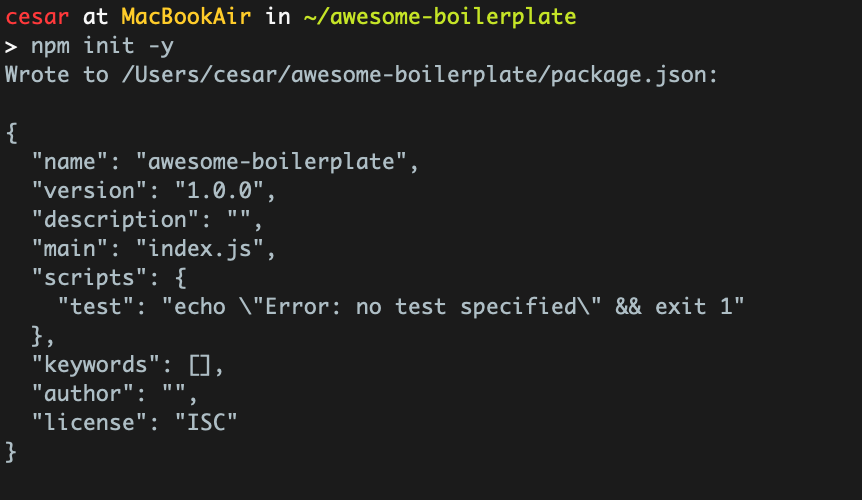 package.json creation
This command will create a file named package.json which will allow you to distribute the project without keeping track of the whole dependencies file which can get really heavy (just check the picture below and you will understand)
 repository](https://cdn-images-1.medium.com/max/2000/1*kdYp6B0dFVuRvap2qn7ieA.jpeg) Taken from node-prune repository
Taken from node-prune repository
Let’s add some dependencies which we will use later on and start getting deeper into this npm stuff. Let’s start by installing a couple of tools that are gonna make your life and your future coworkers’ easier, just run the following command:
npm install --save-dev nodemon eslint
Nodemon is a tool that allows you to write code without having to run it every time you want to test it, it works as a listener that executes every time you save changes in the JS file you are editing.
ESLint provides you linting in your code, it has great integration with editors like VSCode and IDEs like WebStorm, and you can also use it to run automated code reviews (again, we will come back to it later).
Right after doing this, let’s configure these tools so we can start taking advantage of them since the beginning, I will start bottom up because I consider eslint as one of the most important tools to be used in order to keep consistency in a large codebase across all the developers contributing to it:
./node_modules/.bin/eslint --init
 Output of the command
When initializing ESLint in a project, it will prompt a couple of questions that might feel annoying at first, but it makes sense, ESLint is designed to be used in both frontend and backend, and although is smart to analyze your code and come up with some rules, we are initializing it in an empty folder, the questions are:
How would you like to use ESLint? — I like to be driven by ESLint syntax check, sometimes is really annoying, but I ensure you, if you do it that way, your code will be always following the same guidelines.
What type of modules does your project use? — In this case I choose
CommonJSas it is the default in NodeJS backend project, you can also useimport/exportbut then you have to add some extra tools to make it work.Which framework does your code run? — This question is to check if you are using some frontend framework (VueJS, React), so the answer was none of this.
Where does your code run? — This question is to make sure you are working on a backend or frontend project, in this case NodeJS was the answer as we are interested in linter for backend.
How would you like to define a style for your project? — I always like to use predefined guidelines, there are some out there which really pursues perfection and although you can define your own, is time consuming and will always be far from perfect.
Which style guide do you want to follow? — Related to the previous one, in this case they ask you to select among three possibilities (Airbnb, Google, Standard), I always go with the one from Airbnb, they are leaders in the Javascript industry and have really good guidelines (you can check them here), but of course, feel free to choose whichever you want.
What format do you want your config file to be in? — In this step they allow you to select between three possible (Javascript, JSON, package.json), I like to use Javascript because sometimes I need to define extra rules and that format allows me to leave comments in the configuration while json and package.json are less flexible.
With this your ESLint configuration will be finished, and, if everything went alright, then you will have a .eslintrc.js file in your codebase with the following content:
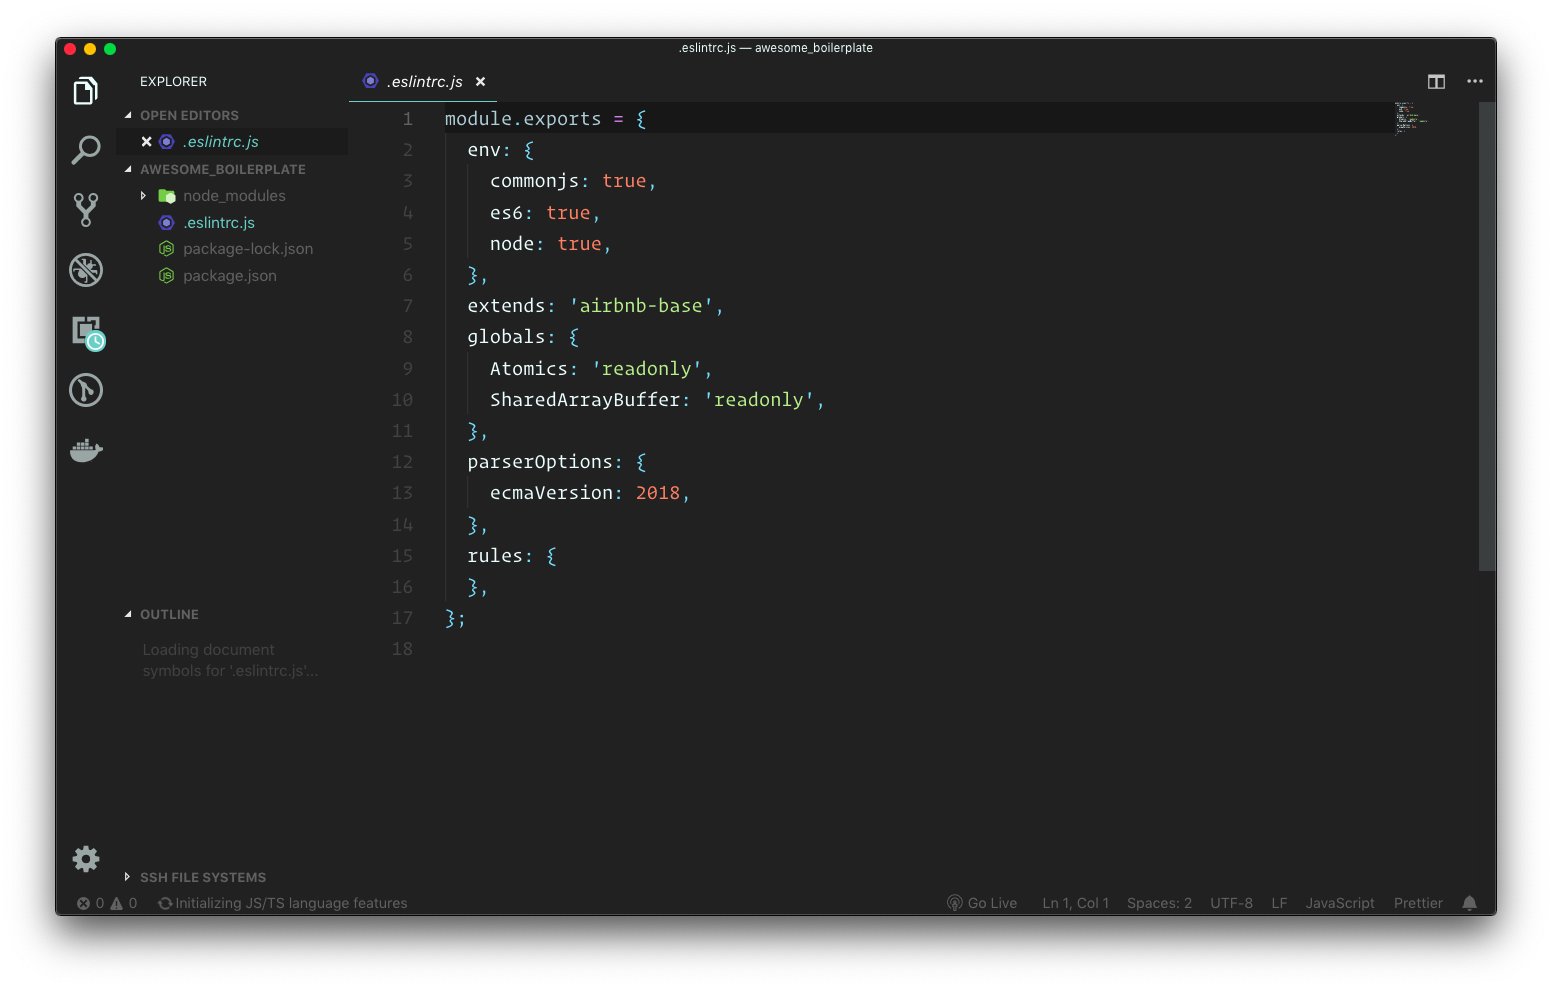 ESLint configuration file content
Nodemon is easier to adopt, in order to test it’s behaviour, let’s see this quick demo:
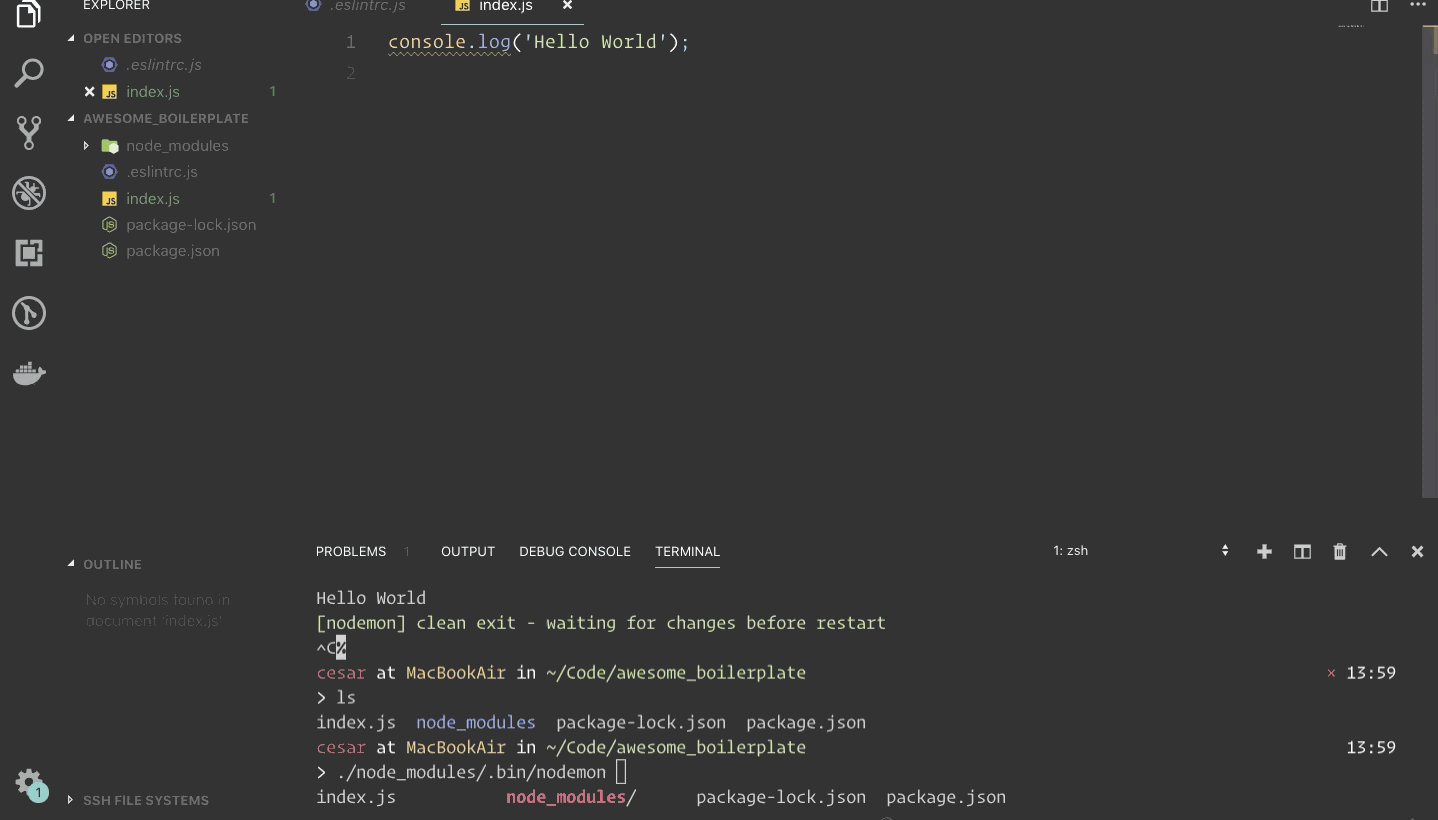 Nodemon demo
Pretty amazing, isn’t it?, now, the only not-that-cool thing is to type the whole ./node_modules/.bin/nodemon index.js every time you want to execute your code, well, guess what?, you don’t have to, you can use nodemon in two ways, firstly you can install it globally by running npm install -g nodemon or (my favorite way), you can install it as a dev dependency (as shown before) and add a script to your package.json file:
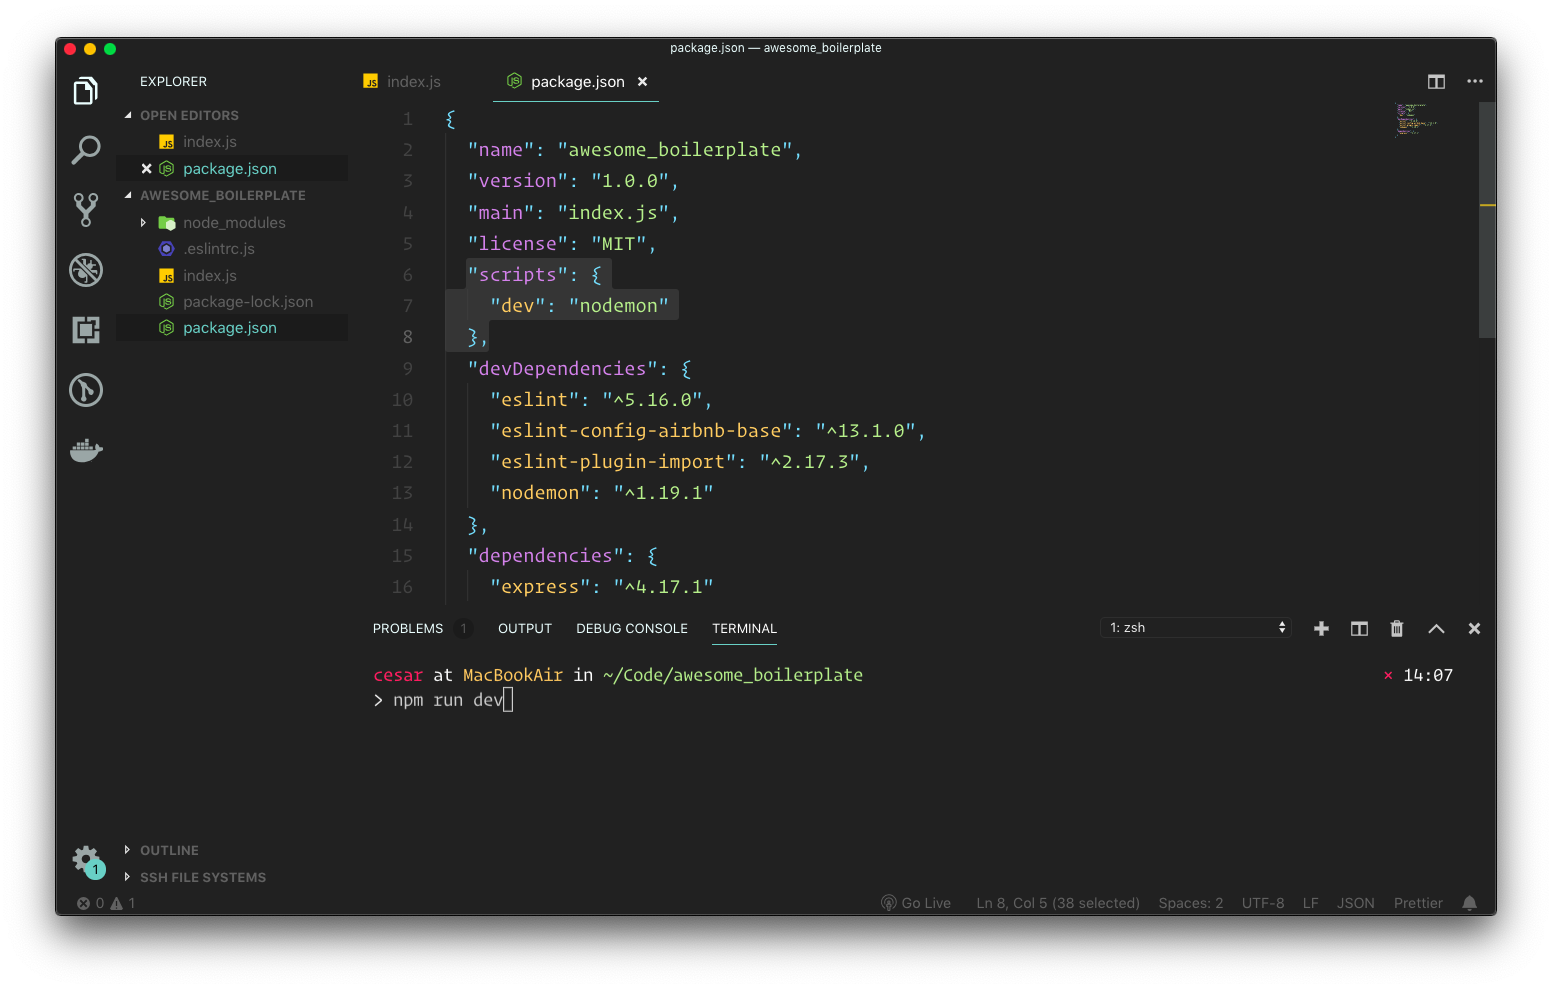 Scripts in package.json
It’s really cool how scripts in package.json file works, when you define a command, it will look into your node_modules/.bin folder for the executable you are calling, if is not found, will look at your folder root, and if it’s not found it will look in your global $PATH environment variable. In this particular case, as highlighted in the screenshot above, we are defining a script with the name dev that is calling Nodemon (in this case is not necessary to explicitly define to nodemon the file to be executed because it brings in the default configuration index.js), to execute this script, is enough by executing npm run dev and you will get the same result as shown in the demo before.
So far, I’ve been showing you how to make everything ready, up to this point, is enough to start working with NodeJS in whatever project you want, you are covering linting, code style, and a really cool way to trigger the execution of your project every time you perform a change in your codebase, but guess what? this is only the beginning, if you want to learn how to start working on top of this pre-configuration we have done so far, keep reading, amazing things are about to happen :)
Creating a small web server
Now that we have a decent and not-that-basic base, let’s create the scaffold that will allow us to hold any web based application.
As mentioned before, NodeJS is only the engine that allow us to run Javascript on the server side, but what we use for creating our applications is up to us. There are several alternatives for web applications out there: Express, Hapi and Koa are the most known, I always prefer to use express, is simple yet powerful and have a strong community creating new ideas every day on top of it.
To install express is enough by executing:
npm install --save express
Once this command finishes, we can start adding some code to our index.js
Let’s start by creating a simple web server with only one endpoint that says hi to a person by receiving it’s name as parameter:
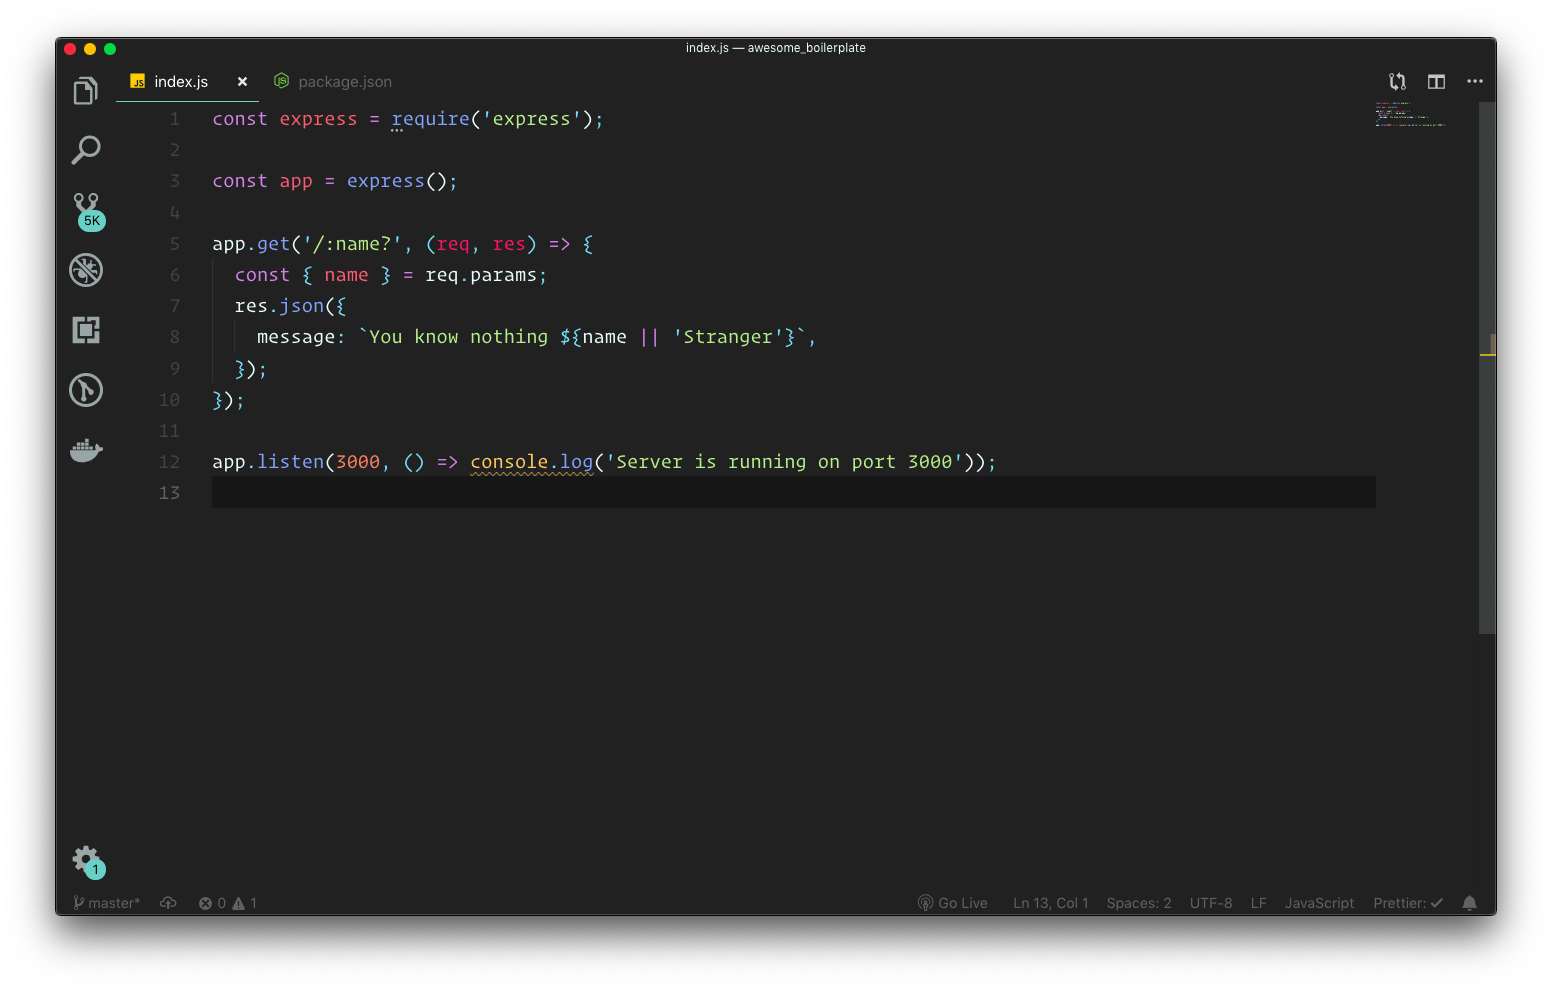 Code example
That’s all, if you execute npm run dev you will start nodemon and with it the server, and by visiting http://127.0.0.1:3000/John you will get the expected result in your browser.
So far, you are able to create a web server using express and start adding logic to it, is more than enough to get a basic web server up and running and create some basic examples on top of it, let’s say your single page portfolio.
In the next chapter I will show how to handle configuration, organize your code in a better way and add support for tests, and I promise you, it will not be that long as this one. Once I release the next chapter, I will update this one and put a link to it, so if you want to stay tune, follow me on Twitter, Github, and Medium, and of course, the source code of the project we are building in this series you can find it here.
If you liked the article show some love by leaving a star in Github and giving me some claps here, that would help me a lot, if there is something you think might be improved or some feedback in general, leave me a comment, I would be really grateful. Thank you so much for your time so far :)

